The first version of our Hunka Burnin’ Love cake was created in the late ’80s at Zingerman’s Delicatessen. Then, as today, the Deli version is a whopping 7-pound cake! It’s a four-layer, 9-inch round cake that can easily satisfy 30 people, but the Deli serves big pieces, so this cake is cut into 16 slices for individual sale. The cake itself is a fudgy, solid butter cake with lusciously smooth chocolate buttercream. For extra goodness, try to find high-fat cocoa to use in the cake recipe.
The recipe we provide here is for a more modest-sized cake that is great for birthdays or just everyday enjoyment. Serve it at room temperature for the best experience. This means letting it come to room temperature for 3 to 5 hours before eating.
Hunka Burnin’ Love Cake
Makes one 8-inch [20-cm] two-layer cake
Hunka Burnin’ Love Cake Layers
All-purpose flour
1 cup plus 2 Tbsp
163 g
Unsweetened cocoa powder
⅔ cup
54 g
Sea salt
¾ tsp
Baking powder
½ tsp
Baking soda
½ tsp
Unsalted butter, room temperature
1¼ cups
281 g
Granulated sugar
1⅓ cups plus 1 Tbsp
281 g
Large eggs
3
Vanilla extract
1½ tsp
Buttermilk (4% milkfat if available)
½ cup
114 g
Chocolate Buttercream
Large egg whites
5
Sea salt
½ tsp
Granulated sugar
1¼ cups
250 g
Chopped chocolate (56% cacao)
1½ cups
272 g
Unsalted butter, room temperature
1⅔ cups
367 g
Vanilla extract
½ tsp
Make the Cake
Preheat the oven to 300°F [150°C]. Spray the sides and bottoms of two 8-in [20-cm] diameter round cake pans with nonstick cooking spray. Set aside.
In a medium bowl, combine the flour, cocoa powder, salt, baking powder, and baking soda. Whisk together until well blended. Set aside.
In the bowl of a stand mixer fitted with the paddle attachment, place the butter and sugar and cream on medium speed until light and fluffy. Scrape down the sides of the bowl as needed to make sure there are no unincorporated chunks of butter. Add the eggs, one at a time, to the butter mixture, beating to incorporate each egg completely before adding the next one. Add the vanilla extract. Mix until the batter is light and creamy.
On low speed, add the dry mixture in three parts, alternating with the buttermilk. Begin with dry ingredients and end with the buttermilk, mixing after each addition.
Divide the batter equally between the two pans. Spread it evenly to cover the entire bottom of the pan. The more evenly you spread the batter, the more even the cake layers will be.
Bake for 40 to 45 minutes. When done, the cake will spring back when lightly pressed in the center and will have begun to pull away from the sides of the pan. If you stick a toothpick in it, it should come out clean.
Cool on a rack for 10 minutes. Run a small knife or metal spatula around the sides of the pans, and invert the cakes onto a cooling rack. Cool completely before icing.
Make the Buttercream
In a medium mixing bowl, combine the egg whites, salt, and sugar and stir to combine. Place over a pan of simmering water and heat the egg white/sugar mixture until the sugar is completely dissolved and the temperature reaches 180°F [82°C]. Use a candy or meat thermometer to assess the temperature. Stir occasionally.
In the meantime, melt the chocolate in a small pan, stirring constantly, or in a double boiler, and let it cool to room temperature.
Transfer the egg white mixture to the bowl of a stand mixer. Using the whisk attachment, whip the mixture on high speed until it doubles in volume, becomes thick and shiny, and has cooled to room temperature. Touch the bottom of the mixing bowl to assess the temperature. The next step is to add the butter. If the egg mixture is too hot, the butter will melt and ruin the buttercream.
When the egg white mixture is at room temperature, put the mixer on medium speed and add the soft butter, a piece at a time, until all is incorporated. The butter should be approximately the same temperature as the egg mixture to ensure easy incorporation and a smooth texture.
Add the vanilla and the melted chocolate and mix to incorporate. Beat on high speed for 1 minute to ensure that all the butter is combined with the whipped egg white and sugar mixture. Scrape the sides of the bowl and mix briefly to make sure the buttercream is homogeneous.
Use the buttercream immediately or place in an airtight container and refrigerate for up to a week or freeze for up to 3 months. If you refrigerate it, let it come to room temperature before using. This could take at least 6 hours, so we recommend removing it from the refrigerator the day prior to using it. You’ll want to re-whip the buttercream before using.
Assemble the Cake
Place one cake layer upside down on a 9-inch [23-cm] cake board or on a serving tray. If it has domed dramatically, remove the domed top with a serrated knife so that the layer is level. Take enough buttercream to make a 1⁄2-in [1.5-cm] layer of filling and spread it evenly over the surface.
Place the second cake layer upside down on top of the buttercream, removing any dome first, if necessary. Use the remaining buttercream to ice the exterior of the cake. Ice the sides and top smoothly if you’re planning to pipe a border on the edges. Ice rustically, swirling the buttercream with your spatula, if you prefer not to have a border.
If you choose to make a border, reserve some of the buttercream and put it in a pastry bag with a star tip. Pipe a border around the top and bottom edges.
She has been an avid food lover and baker since her childhood in Nova Scotia, Canada. After high school Amy moved to Cambridge, MA and received her bachelor’s degree from Harvard University. She then followed her passion for food and learned to cook and bake at L’ecole de Gastronomie Francaise at the Ritz Hotel in Paris, France as well as in Michigan restaurants. In 1999 she received her MBA from Columbia University.
Amy came to Zingerman’s Bakehouse when it opened in 1992 as one of the original bakers on the staff of eight. She soon became the first manager of the bread bakery, then the manager of the pastry kitchen and in 2000 she became a partner.
Amy has been working in the food world for over 20 years and is passionate about hands-on baking, teaching about baking and business, developing businesses and people. As well as teaching at BAKE! Amy presents for ZingTrain on our business practices. A few of the Bakehouse items she is personally responsible for developing are the Old School Apple Pie, Buenos Aires Brownies, and our Gingerbread Coffeecake. In addition to developing items, Amy is a promoter of classic bakery favorites from many cultures and has brought traditional standards to the Bakehouse such as Paris Brest, Hummingbird Cake, and Maple Cream Cookies.
Hi! Great recipe. However, step 3 notes to “place the butter and sugar and cream on medium speed”, however there’s no mention of cream (or amount) in the ingredient list. Do you mind letting us know if and what cream should be used? Thanks!
Hi Lizzie! In this case, ‘cream’ is being used as a verb so at this point you’re mixing the butter and sugar together. We can definitely see how the wording can be misleading. Thanks for reaching out for clarification!
Deb Fitzsimmons
1 year ago
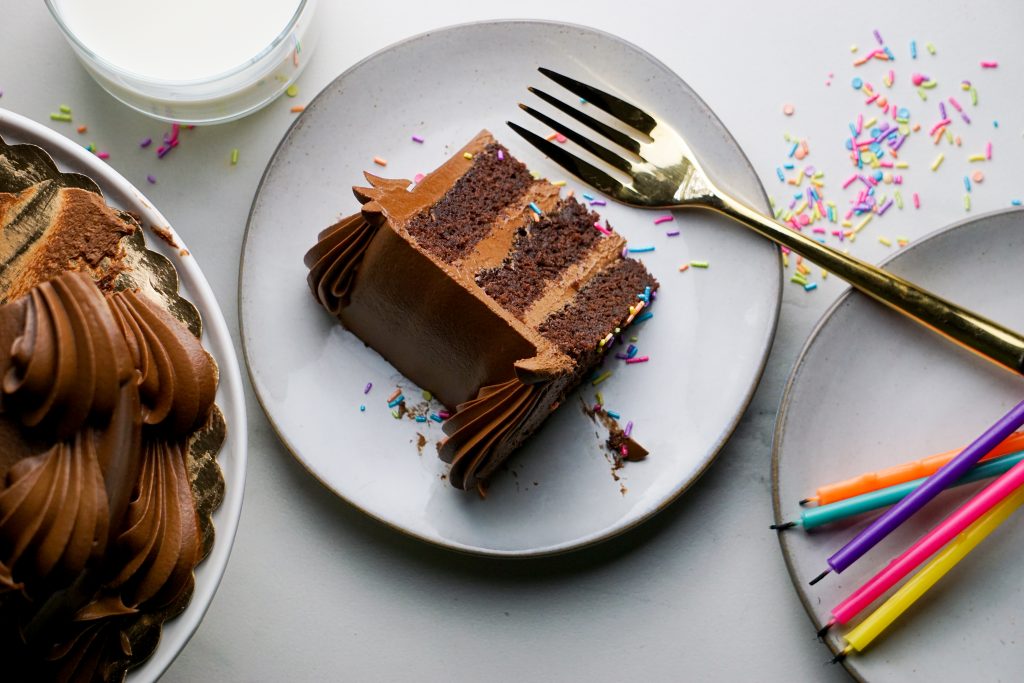
The instructions call for 2 8-inch pans, but the photo shows 3 layers. Are we supposed to split the layers are use 3? Are we supposed to use 3 cake pans and not 2?
Hi Deb, Sorry about that. This picture does not match the instructions. At the bakery we make this cake in a cariety of ways with different numbers of layers hence the photo. For this recipe we’re suggesting just eh two layers as written.


would love to have this receipe
Hi! Great recipe. However, step 3 notes to “place the butter and sugar and cream on medium speed”, however there’s no mention of cream (or amount) in the ingredient list. Do you mind letting us know if and what cream should be used? Thanks!
Hi Lizzie! In this case, ‘cream’ is being used as a verb so at this point you’re mixing the butter and sugar together. We can definitely see how the wording can be misleading. Thanks for reaching out for clarification!
The instructions call for 2 8-inch pans, but the photo shows 3 layers. Are we supposed to split the layers are use 3? Are we supposed to use 3 cake pans and not 2?
Hi Deb,
Sorry about that. This picture does not match the instructions. At the bakery we make this cake in a cariety of ways with different numbers of layers hence the photo. For this recipe we’re suggesting just eh two layers as written.